Thursday, November 29, 2007
Wednesday, November 28, 2007
Procedures to install windows XP

1.
Read the End-User License Agreement, and then press F8.Note If your Windows XP CD-ROM is an upgrade, you are prompted to insert a CD-ROM of a previous operating system to verify upgrade compliance. Remove the Windows XP CD-ROM, and then insert the CD-ROM from your previous operating system into the CD-ROM drive. You can use the CD-ROM to upgrade from the following versions of Windows:
Windows 98Windows 98 Second EditionWindows Millennium EditionWindows NT 4.0Windows 2000 Professional
2.
When you are prompted for the Windows XP CD-ROM, remove your previous operating system CD-ROM, and then insert your Windows XP CD-ROM.
3.
To install Windows XP by starting the computer from the Windows XP CD-ROM, insert the Windows XP CD-ROM into your CD-ROM or DVD-ROM drive, and then restart the computer.
4.
When you see the "Press any key to boot from CD" message, press any key to start the computer from the Windows XP CD-ROM.
5.
At the Welcome to Setup screen, press ENTER to start Windows XP Setup.
6.
Follow the instructions on the screen to select and format a partition where you want to install Windows XP.
7.
Follow the instructions on the screen to complete Windows XP Setup.
Tuesday, November 27, 2007
Procedures to install Windows 2000
 1.Insert the Windows 2000 CD and reboot the computer
2.The text based portion of setup will start
3.Hardware will be detected by the setup program and you can press F6 to install any 3rd party drivers needed for disk detection etc. The standard drivers will then be loaded
4.Press Enter to set up Windows 2000 (other options include R to repair a damaged existing installation or F3 to abort installation)
5.Read the license and press F8 (you no longer need to read all of it to press F8)
6.A list of your disks and partitions will be shown. Select/create a partition to install on and press Enter
7.If its an existing partition a warning will be given. To continue press C
8.You have the option to install NTFS, FAT or if it was an existing partition leave as is. Make you selection and press Enter.
9.Files will be copied and the machine will reboot to the GUI phase of installation
10.When the GUI phase starts click Next
11.The setup program will detect hardware present in the machine, this make take a while
12.The next stage allows the user to select the locales for the computer, click Customize
13.Under the General tab and select the locale, e.g. "English (United Kingdom)". 15.Also click 'Set Default..' to select the system locale and click OK. Click Apply then OK. Under the 'Input Locales' tab you can also set the default locale and remove US if that is not a required installed locale.
16.Click Next
17.Enter a name and organization
18.Enter the license key for the software and click Next
19.Select the license mode, per seat or per server and click Next. You don't have this stage for a Professional installation
20.Enter a computer name and an Administrator password. Click Next
21.Select the components you wish to install and click Next (e.g. DNS under Networking Services)
22.Select a Data and Time zone and click Next
23.The networking components will be installed
24.Once installed select if you want Typical network settings which is TCP/IP using DHCP or use Custom to enter IP address's, install extra protocols etc. Click Next
25.Select a workgroup or domain for the computer and click Next. If joining a domain an account for the domain may be needed if an account has not already been added
26.The components will now be installed on the machine
27.The Start menu items will be added, components registered and temporary files are removed
28.Click Finish
29.The machine will now reboot and installation is complete. You should now configure any components. The first time you logon to a Professional installation it gives the option to create an account to automatically logon as for future startups.
You should now install the Command Console as it may save your life!
Procedures in installing Windows 98

1.Insert the Windows CD and restart your PC.
2.Once the Windows 98 Setup Menu comes up choose option #2 (Boot from CD-ROM)
3.Then the Windows 98 Startup Menu will come up. Select Option #1. (Start Windows 98 Setup from CD-ROM)
4.Now your computer will install some drivers so please wait for a few moments.
5.Now a blue setup screen will come up. Press Enter.
6.Setup then wants to do some system tests. Just press Enter.
7.Scandisk will now run, please wait.
8.After ScanDisk completes, Windows will copy a few important files for setup.
9.Now the graphical Windows 98 Setup Screen will come up.
10.Click Continue and wait for the setup wizard to complete.
11.Now it will ask you in which directory to install Windows too. The default directory is just fine so click Next.
12.Setup will now prepare the directory, please wait.
13.Setup will now check for installed components and disk space, please wait.
14.Setup will now prompt you to choose the type of installation. Choose Typical if you have a desktop computer or Portable if it is a laptop.
15.Windows will prompt you to install components, just choose Continue.
16.If a network card is detected a network information screen will appear. Type in the required information and click Next
17.Select your country settings, United States should be chosen by default.
18.Now finally the main part of Setup is here. Setup will start copying files. This could take some time, please be patient.
19.Once setup is done copying files, Windows will restart automatically.
20.The Windows 98 Startup Menu will now appear. Select option #1 (Boot from Hard Disk)
21.The Windows 98 booting screen will appear!
22.Now Windows will prompt you for user information, enter it and click Continue.
23.Now the License Agreement. Read it and if you agree click on "I accept the Agreement" and click Next. If you select "I don't accept the Agreement" then setup will end.
24.Now input your product key or certificate authenticity code. This is 16 digits and is located on the back of your CD case or on the Windows 98 Book. If you have an OEM computer then it could be on the side or back of your computer. Click Next to continue.
25.Click Finish.
26.Setup will now finalize the hardware and install settings.
27.Setup will now install plug and play devices.
28.Your computer will restart automatically.
29.The Windows 98 Startup Menu will appear. Select option #1 (Boot from Hard Disk)
30.Windows will start booting for the second time.
31.Setup will continue installing hardware.
32.Now setup will prompt you to enter in your time, date, and time zone. Once selected click on Apply and then OK.
33.Windows will continue to setup Windows items.
34.The computer will restart automatically once again.
35.The Windows 98 Startup Menu will appear. Select option #1 (Boot from Hard Disk)
36.Windows will boot for the third time.
37.Windows will update system settings.
38.Now finally you have reached the Windows Desktop!
39.You also may need to install your hardware drivers. If everything is working properly then you shouldn’t worry about them.
Friday, November 16, 2007
Thursday, November 15, 2007
Latest Processor
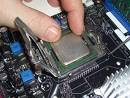
Conspiracy theorists claim that Intel, tired of replacing processors with bent pins under warranty, decided to move the fragile pins to the socket, offloading the warranty headaches onto motherboard manufacturers. In fact, that makes no sense. Intel itself is the largest motherboard manufacturer, and replacing a motherboard under warranty is more costly than replacing a processor. Various articles have also claimed that Socket 775 is good for only 5 (or 10, or 20) insertion cycles, with the implication that the older Socket 478 is essentially indestructible. In fact, Socket 478 and Socket 775 are both rated for 20 insertions, so neither is more durable than the other. Even on our test benches, we've never worn out a socket or a processor, and we don't expect that to change with Socket 775.
Latest PCI Slots
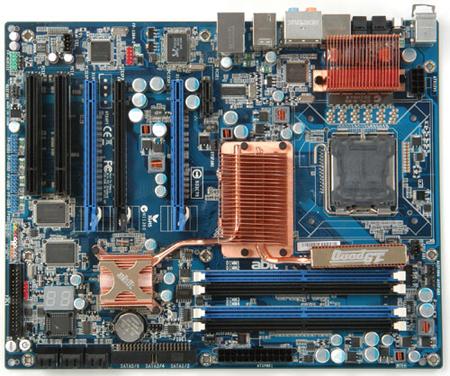
It looks like the latest Intel offering on the chipsets aimed at desktop computer systems and high performance levels is doing pretty good as just a few days after its official launch date there are many motherboards based on it. While most first tier mainboard producers like Asus, Gigabyte and MSI already announced and presented products based on the Intel X38 chipset, Abit is a little late to the party as the company only now announced its X38 centered mainboard, the IX38 QuadGT Speedster.
The IX38 QuadGT Speedster mainboard from Abit comes equipped with the LGA 775 socket so it is able to accommodate Intel made central processing units that are produced using the 65 and the 45 nanometer fabrication processes. Just like the Asus made mainboards that are centered around the Intel X38 high performance chipset, the Abit product is able to handle a superior frontside bus speed of 1600MHz that is higher than the officially supported 1333Mhz rating.
As this mainboard is aimed at the gaming and enthusiast market segments it comes with solid state capacitors that should increase its reliability as well as DDR2 compatible random access memory slots that are rated for 1066Mhz memories while also integrating two full speed x16 PCI Express slots that offer support for AMD CrossFire setups. This new Abit mainboard also comes with digital PWMs that are based on the Smart-Slave technology, allowing for a much better efficiency of conventional PWMs while keeping the noise level down.
On the cooling side, just like MSI and Asus, Abit went for a copper heat pipe based passive cooling solution that is able to cool off the hottest spots of the mainboard, including the PWM area, northbridge and southbridge, while at the same time looking more slim and lightweight than other similar products.
The latest Intel compatible mainboard from Abit comes with all the normal features that users expect to see in a nowadays product including Gigabit Ethernet, six Serial ATA II ports that are offering integrated RAID capabilities as well as JBOD, eight high definition surround sound processor, 12 high speed USB 2.0 ports and a legacy Parallel ATA connector.
The Abit IX38 QuadGT Speedster mainboard is now readily available for purchase and it comes with a price tag that looks pretty good as it offers a well balanced price and performance ratio at around $200.
Latest Memory
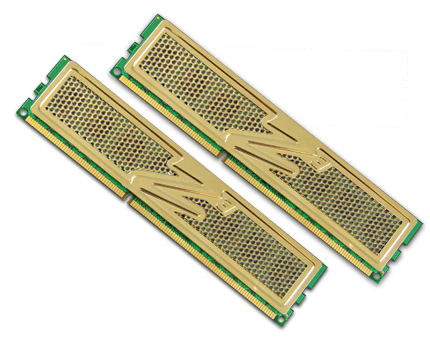
OCZ announced the launch of its latest "ultra-high performance and high reliability memory" modules that are part of the DDR3 Gold series targeted at "mainstream system builders, gamers, and professionals upgrading to the latest Intel platforms". The latest of the Gold DDR3 memory modules features a high clock frequency of 1600MHz andlow 8-8-8 timings. This memory is a more standard abiding one than the 1800MHz modules that jumped 200MHz over the JEDEC's certified standard for DDR3 and it works with 1.8V, a little lower than the 1.9V needed by the previous model."More and more consumers are now starting to adopt DDR3 solutions with the platforms becoming more readily available," commented Alex Mei, EVP and CMO of OCZ Technology Group and he was cited in the company's press release. "To meet the needs of all levels of consumers during the proliferation of DDR3 technology OCZ is now introducing a DDR3-12800 Gold kit specifically designed for gamers looking to take advantage of the performance benefits of DDR3 technology in their cutting-edge desktops."The DDR3 PC3-12800 Gold Edition memory modules are developed to make the most of the new Intel P35 and X38 Express chipsets and they will be available in dual channel kits( 2x1024MB) and separate 1GB packaged modules. According to the press release, "OCZ has been working closely with the leading platform providers to ensure optimal performance and compatibility on all the next generation computing platforms that will be introduced later this year".Just like all OCZ products, this too comes with a lifetime warranty and has been hand tested for "quality assurance and compatibility". The gold-mirrored XTCXtreme Thermal Convection Z3 heatspreader that is specific to OCZ's Gold memory products is used on these memory line as well, in order to achieve the best heat dissipation and to ensure optimal system stability.
Tuesday, November 13, 2007
Asus P5N-E SLI Motherboard

You know that when building the perfect PC, the motherboard is as important as anything. That's why you should check out this Asus P5N-E SLI mobo. This motherboard supports the latest Intel® Quad-core processors in LGA775 package. It's excellent for multi-tasking, multi-media and enthusiastic gamers! It's designed for great performance and overclocking! With an NVIDIA nForce 650i SLI chipset and a front side bus capable of 1333/1066/533 MHz, your machine will be ready to chew up anything you feed it. Four 240-pin DIMM sockets support up to 8GB of DDR2 non-ECC unbuffered memory. DDR2 is the next generation memory technology to replace the current DDR. With the highest speed up to 800MHz, DDR2 memory provides great performance for 3D graphics and other memory demanding applications. This great platform has 2 PCI Express x16 slots, 1 PCI Express x1, and 2 PCI 2.2 slots! There's Gigabit LAN, support for up to 8 USB 2.0 ports, and tons more features! Check out the detailed specifications for all the goodies in this powerful motherboard. Don't settle for something less. Pick up the Asus P5N-E SLI motherboard today!
Subscribe to:
Posts (Atom)

